Wednesday, May 07, 2008

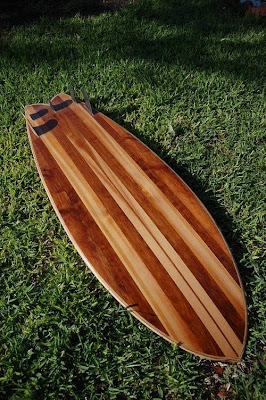
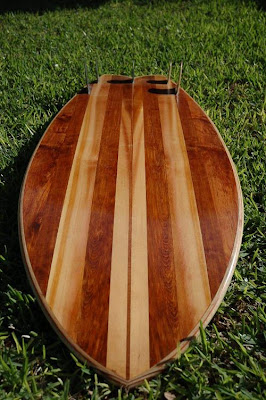
Cedar skin five-fin fish

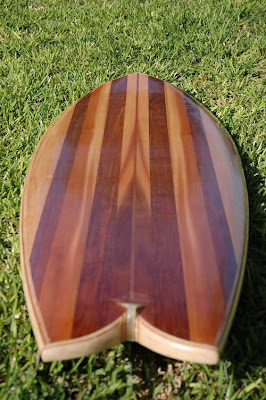
5'11' x 22.5 x 2.625 with the Greg Griffin-style 5-fin setup in ply and carbon fiber. I tried to get with Greg to get a set of his fins, but we were having trouble connecting and I was frothing to get this thing finished. He was generous enough, however, to share the placements with me, and a friend forwarded me some tracings of the fin templates themselves, so I'm hoping I got pretty close to how the master himself would have done it.

I've surfed it a couple of times now, and it is definitely on the low end of the volume scale for me, but once up and going it is very drivey, as you would expect with 5 fins, but also very loose, which you wouldn't expect. I can't wait to get it into some good surf.


Good call, lets see if you can ruin your new favorite board

I've had this idea in mind ever since deciding to take that bumblebee quad back. I figured I'd fix it up, and if it worked well for me I would make it into the ultimate travel board.

Let me preface this by saying that none of these ideas are my own. I simply adapted them to my needs, and improved them where I saw fit.

I didn't take many photos of the build process since my wife had the camera out of town when I was doing much of it, but I'll narrate best I can with the few cellphone pics I took.

I started by taking .5" ID carbon fiber tubing and glassing them into slots I routed into the board. I placed them close to the bottom skin and close to the rails so they'd have something to "grab" onto. The ends of the tubes were plugged with epoxy and the centers of the tubes were plugged with pencils wrapped with tape so the tube wouldn't splinter when the saw cut through it. The center tube was placed close to the deck, but the alignment didn't wind up being perfect with the other two, so it looks like I'll have to get by with just the two side tubes.

Here's a shot of the routered slots, the carbon fiber tubes before they went in, and the strips of balsa I used to cap the slots.


After putting the carefully aligned tubes into the board and re-capping the balsa and re-glassing, I made a jig to clamp on the board that would guide it down the sides of my table saw. Then I cut that sucker in half.

I totally borrowed the idea of placing the tubes before sawing from the Pope bisect, so don't give me any credit for that idea. I'm not an "idea guy", I'm more of a "planning and execution" guy.


After that I cut up a longboard centerfin box and inlaid that into the foam so it was oriented vertically, and so each half of the board would have two sections of finbox that would face each other when the halves were mated up. should have taken a photo of this part, but when you see how it is bolted together you'll get it.

I used carbon fiber to tie the finbox sections to the deck skin, so they wouldn't come out under tension

then I put the half-circle abs plastic caps over the finboxes, and glassed over the exposed cut section, and lapped that over all the other work on the outside of the board. I had to tape down the glass to get it all lay down right in one pull.

then I put a thin sheet of ABS plastic on each half for a flat mating surface. Again, I can't take credit for this or the idea to use the finbox as a screw anchor, it was Pierre on Swaylocks who did this first, albeit without the CF tubes for rigidity.


Here's the finished work.
The anchoring system, under the plastic caps are chunks of longboard center finbox facing each other so the bolt has something to anchor against. The aluminum bolt has holes through its head so it can be turned with a standard fcs-size allen wrench. Again, not my idea.


All the parts you need.
Opened up so you can see the mating surfaces and the tube openings for the carbon fiber rods. You can also see the center tube which will remain empty because I didn't get it aligned right with the other two. If I were to do it again I would use a single large tube in the center, that way alignment isn't an issue.


Assembled and ready to surf. Well, except for that patch on the tail... I couldn't knock this thing around my shop for a couple of weeks without dinging it, right?


I took it out in its new form for the first time yesterday, and I'm happy to report that I didn't manage to ruin it with this process. Thank goodness for that. All in all, it added about a pound of weight, but it was pretty light to begin with, so no worries on that.


Next step: Making a different tail half. If I can create a pintail section to mate with the existing nose, I'll essentially have two entire boards for a full range of surf conditions, and will only have to pack three short sections on surf trips. The ultimate travel board!

Gentlemen, we can rebuild him. We have the technology.

I'm back, and back to work!

One of the nice things about these compsand boards is that they can be rebuilt when needed. While I was away, I was in touch with the guy who had gotten the Bumblebee Quad I had made in my first batch of compsands. It had sustained some damage in some collision mishaps, and had been repaired poorly, to say the least. It also had some performance limitations that he wasn't entirely happy with, so I took it back in trade on one of the classic fish I had made in the last batch. I'm happy to say he's very happy with the fish.

So, I had my work cut out for me when this board got back into my hands, but I figured it would be a good warm-up for getting back into shaping again.

The deck was badly damaged, so it had to be removed first.


Then the areas where the rail was damaged had to be replaced. Since the rails are built up in multiple layers of balsa, they have to be replaced in the same way. The stair-steps are so the joints are staggered so as not to create any weak points in the rail.


The biggest problem with the performance of the board was that it was, quite simply, over-rockered. Too much curve = maneuverable but slow board. The top part of the photo shows the original rocker and the bottom half shows the rocker as I re-set it when I vacuumed the skin back on. Much better, and reflective of the shaping experience I have gained in the time since I originally made this board.

The finished board with new skin and pinline. I have been riding this board almost exclusively since fixing it up, and it is my new favorite ride. Funny how that works out.