Good call, lets see if you can ruin your new favorite board
I've had this idea in mind ever since deciding to take that bumblebee quad back. I figured I'd fix it up, and if it worked well for me I would make it into the ultimate travel board.
Let me preface this by saying that none of these ideas are my own. I simply adapted them to my needs, and improved them where I saw fit.
I didn't take many photos of the build process since my wife had the camera out of town when I was doing much of it, but I'll narrate best I can with the few cellphone pics I took.
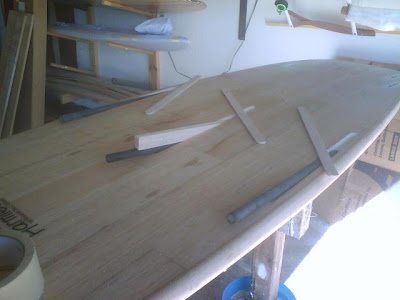
I started by taking .5" ID carbon fiber tubing and glassing them into slots I routed into the board. I placed them close to the bottom skin and close to the rails so they'd have something to "grab" onto. The ends of the tubes were plugged with epoxy and the centers of the tubes were plugged with pencils wrapped with tape so the tube wouldn't splinter when the saw cut through it. The center tube was placed close to the deck, but the alignment didn't wind up being perfect with the other two, so it looks like I'll have to get by with just the two side tubes.
Here's a shot of the routered slots, the carbon fiber tubes before they went in, and the strips of balsa I used to cap the slots.
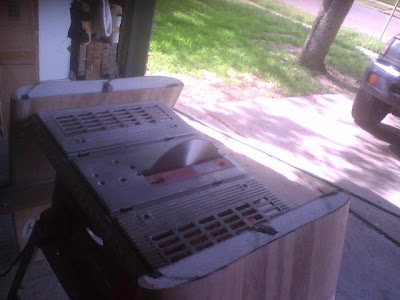
After putting the carefully aligned tubes into the board and re-capping the balsa and re-glassing, I made a jig to clamp on the board that would guide it down the sides of my table saw. Then I cut that sucker in half.
I totally borrowed the idea of placing the tubes before sawing from the Pope bisect, so don't give me any credit for that idea. I'm not an "idea guy", I'm more of a "planning and execution" guy.
 After that I cut up a longboard centerfin box and inlaid that into the foam so it was oriented vertically, and so each half of the board would have two sections of finbox that would face each other when the halves were mated up. should have taken a photo of this part, but when you see how it is bolted together you'll get it.
I used carbon fiber to tie the finbox sections to the deck skin, so they wouldn't come out under tension
then I put the half-circle abs plastic caps over the finboxes, and glassed over the exposed cut section, and lapped that over all the other work on the outside of the board. I had to tape down the glass to get it all lay down right in one pull.
then I put a thin sheet of ABS plastic on each half for a flat mating surface. Again, I can't take credit for this or the idea to use the finbox as a screw anchor, it was Pierre on Swaylocks who did this first, albeit without the CF tubes for rigidity.
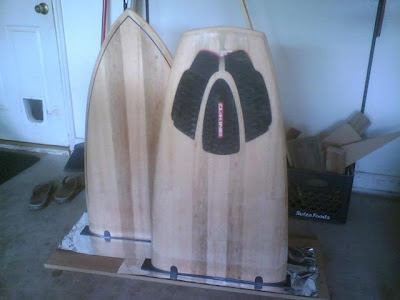
Here's the finished work.
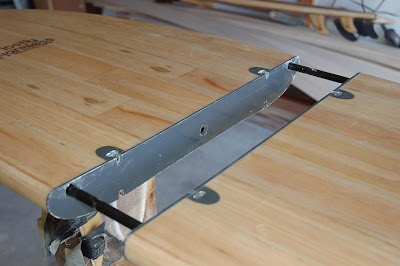
The anchoring system, under the plastic caps are chunks of longboard center finbox facing each other so the bolt has something to anchor against. The aluminum bolt has holes through its head so it can be turned with a standard fcs-size allen wrench. Again, not my idea.

All the parts you need.
 Opened up so you can see the mating surfaces and the tube openings for the carbon fiber rods. You can also see the center tube which will remain empty because I didn't get it aligned right with the other two. If I were to do it again I would use a single large tube in the center, that way alignment isn't an issue.
Assembled and ready to surf. Well, except for that patch on the tail... I couldn't knock this thing around my shop for a couple of weeks without dinging it, right?

I took it out in its new form for the first time yesterday, and I'm happy to report that I didn't manage to ruin it with this process. Thank goodness for that. All in all, it added about a pound of weight, but it was pretty light to begin with, so no worries on that.
Next step: Making a different tail half. If I can create a pintail section to mate with the existing nose, I'll essentially have two entire boards for a full range of surf conditions, and will only have to pack three short sections on surf trips. The ultimate travel board!
Let me preface this by saying that none of these ideas are my own. I simply adapted them to my needs, and improved them where I saw fit.
I didn't take many photos of the build process since my wife had the camera out of town when I was doing much of it, but I'll narrate best I can with the few cellphone pics I took.
I started by taking .5" ID carbon fiber tubing and glassing them into slots I routed into the board. I placed them close to the bottom skin and close to the rails so they'd have something to "grab" onto. The ends of the tubes were plugged with epoxy and the centers of the tubes were plugged with pencils wrapped with tape so the tube wouldn't splinter when the saw cut through it. The center tube was placed close to the deck, but the alignment didn't wind up being perfect with the other two, so it looks like I'll have to get by with just the two side tubes.
Here's a shot of the routered slots, the carbon fiber tubes before they went in, and the strips of balsa I used to cap the slots.

After putting the carefully aligned tubes into the board and re-capping the balsa and re-glassing, I made a jig to clamp on the board that would guide it down the sides of my table saw. Then I cut that sucker in half.
I totally borrowed the idea of placing the tubes before sawing from the Pope bisect, so don't give me any credit for that idea. I'm not an "idea guy", I'm more of a "planning and execution" guy.
 After that I cut up a longboard centerfin box and inlaid that into the foam so it was oriented vertically, and so each half of the board would have two sections of finbox that would face each other when the halves were mated up. should have taken a photo of this part, but when you see how it is bolted together you'll get it.
I used carbon fiber to tie the finbox sections to the deck skin, so they wouldn't come out under tension
then I put the half-circle abs plastic caps over the finboxes, and glassed over the exposed cut section, and lapped that over all the other work on the outside of the board. I had to tape down the glass to get it all lay down right in one pull.
then I put a thin sheet of ABS plastic on each half for a flat mating surface. Again, I can't take credit for this or the idea to use the finbox as a screw anchor, it was Pierre on Swaylocks who did this first, albeit without the CF tubes for rigidity.

Here's the finished work.
The anchoring system, under the plastic caps are chunks of longboard center finbox facing each other so the bolt has something to anchor against. The aluminum bolt has holes through its head so it can be turned with a standard fcs-size allen wrench. Again, not my idea.

All the parts you need.
 Opened up so you can see the mating surfaces and the tube openings for the carbon fiber rods. You can also see the center tube which will remain empty because I didn't get it aligned right with the other two. If I were to do it again I would use a single large tube in the center, that way alignment isn't an issue.
Assembled and ready to surf. Well, except for that patch on the tail... I couldn't knock this thing around my shop for a couple of weeks without dinging it, right?

I took it out in its new form for the first time yesterday, and I'm happy to report that I didn't manage to ruin it with this process. Thank goodness for that. All in all, it added about a pound of weight, but it was pretty light to begin with, so no worries on that.
Next step: Making a different tail half. If I can create a pintail section to mate with the existing nose, I'll essentially have two entire boards for a full range of surf conditions, and will only have to pack three short sections on surf trips. The ultimate travel board!
posted by Jarrod at 10:00 AM
![]()
![]()

0 Comments:
Post a Comment
<< Home